
The first step to creating a supervised Digital Pathology AI is to annotate whole-slide-images. MIKAIA® uses various annotation concepts, and understanding these concepts will make your experience with MIKAIA® much smoother and more efficient.
Annotations and Annotation Classes for Whole-Slide-Images
- Annotation Class (example “Tumor”)
- Attributes
- Class name
- Tags
- Shape Style, fill color, outline color, outline width, transparency
- Text Style: color, font size
- Annotations
- Annotation 1
- Attributes: position, annotation type (rectangle, polygon, …), shape, z-order, text
- Annotation 2
- Annotation N
- Annotation 1
- Attributes
Annotations are drawn manually by the user or they are generated by an app. An annotation always belongs to an Annotation Class. A class name could be “Tumor”, “positive cells”, or similar. When a user draws a new annotation, it is added to the currently selected class. Classes are listed in the “Annotations” side bar. When no class exists yet, a new class with a placeholder name is automatically created. Class names must be unique. Individual annotations cannot be styled, but instead the Annotation Style (appearance) is a property of the annotation class. Annotations of different types (rectangle, polygon, brush, …) can be mixed in the same class.
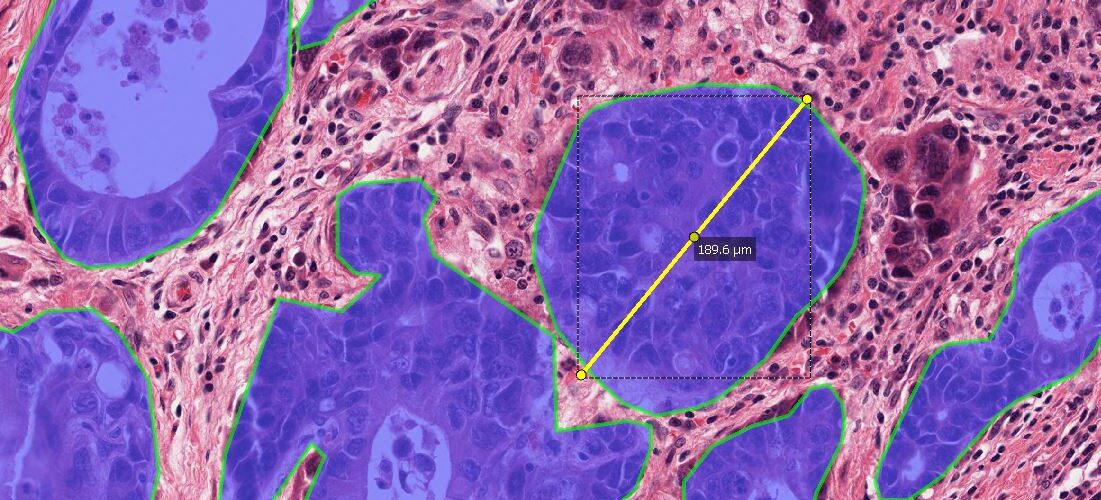
Each annotation can have a text. Additionally, when an annotation is selected, its position and area (in µm²) are displayed in a small text box right next to the annotation.
Moving Annotations into another Class
Annotations can be assigned to another class in two ways:
- First select one or multiple annotations (see chapter further below on ways for selecting annotations), and then click “Adopt selected annotations” in the target class’s drop down menu (in the Annotation side panel).
- The Class Changer Brush will move all annotations that it touches into the currently selected class. The brush’s shape is a circle and its diameter can be changed via the toolbar or by with CTRL+mouse wheel.
Annotation Shapes
By now, it is clear how annotations in MIKAIA® are organized in classes. Each annotation is of a certain shape type. Currently supported types are: line, rectangle, ellipse, polygon, path, cell, emoji/icon, margin, heatmap / mask. The difference between polygons and shapes is that a shape can have holes and a polygon cannot. Actions are available to convert various shapes into a polygon or path. When a path is converted into a polygon, all holes become independent polygons. For paths, advanced operations are available to fuse, subtract, intersect, or clip-to-tissue. The margin annotation is a polyline, but its width can be interactively changed, which makes it ideal for marking the tumor micro environment. Cell annotations may comprise two polygons: one that outlines the nucleus and one that outlines the cell boundary. In contrast to all other types, heatmaps and masks are not vectorized but rasterized. Except for cell and heatmap/mask annotations, all other annotations can be drawn manually.
Annotation Tools
Various annotation tools are available: The pointing-hand tool is used to pan in the slide or select single annotations. The Selection Tool can be used to multi-select annotations by drawing a rectangle. The line, emoji, rectangle, and ellipse tools should not require further explanation. The Point Tool, in contrast to the Ellipse Tool, creates a fixed-sized circle at each click. The Pen Tool creates polygons and can be used in one of two ways: by keeping the mouse button pressed or by clicking for each additional line segment. A right-click removes the last segment. The tool allows to pan without interrupting the current annotation. This tools should also be the preferred tool when using a touchscreen with a stylus pen (e.g., WACOM tablets are popular) for drawing annotations. The Margin Tool creates a polyline and the mouse-wheel is used to configure its width. The Brush Tool draws or extends paths. By pressing the ALT-button, the Brush Tool becomes the Eraser Tool. Similarly, the Magic Brush Tool also draws or extends paths and pressing the ALT-button turns it into the Magic Eraser Tool. The Magic Brush and Eraser clip the round shape to the underlying image content. The tolerance and radius can be configured. They also work well in conjunction with Stain Unmixing. The Magic Brush can also be used to create cell segmentation by hovering over a cell, which previews the outline, and then clicking once the outline fits nicely. The Class Changer Tool is a brush that does not create annotations but moves all annotations it touches into the currently selected class.
Managing Annotation Classes in Groups
- Group 1
- Annotation Class 1
- Annotation Class 2
- Group 2
- Annotation Class 3
- Annotation Class 4
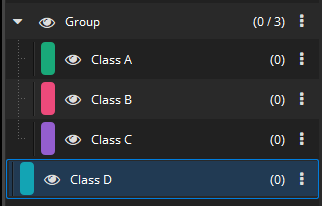
Some image analysis apps, in particular those detecting cells, generate thousands of annotations in quite a lot of annotation classes. Beginning with MIKAIA® v1.5, classes can be grouped together in the annotations class list. This helps keeping an overview. Annotation Class groups can be collapsed so that the Annotation Class side panel does not get cluttered. Further actions are available from an Annotation Class Group: show/hide all classes, select all annotations, delete all annotations, and more.
Annotation Class Groups are used for different purposes by the various image analysis apps. For instance, the IHC Cell Detection App uses one group per scan area, when a slide contains more than one specimen. The Fluorescence Cell Analysis App can create multiple annotations per cell, when more than one mode is enabled by the user. It will then group the respective class types: all “per-marker” classes (“CD8+”, Ki67+”, …) all “per-marker-combination” classes (“A (CD8+Ki67+), B (CD3+CD8+Ki67+), ..), and all cluster classes (“Cluster 1”, “Cluster 2). The user can also group classes manually simply by dragging one class on top of another.
Annotation Class Tags
Annotation Class Tags are another concept that helps dealing with many annotation classes. Most apps automatically assign tags to the classes generated during an analysis. Tags can also be created manually by the user. A tag is a word that can be assigned to one or more classes. Annotation class tags are displayed at the bottom of the annotation side panel as blue rounded buttons. By clicking a tag button, all tagged classes’ visibility will be toggled at once, i.e., they will be shown or hidden with a single click. Similarly, in controls (used in various places), where the user is asked to select one or more classes, the class selection can be toggled by using tags. This is convenient when many classes exist.
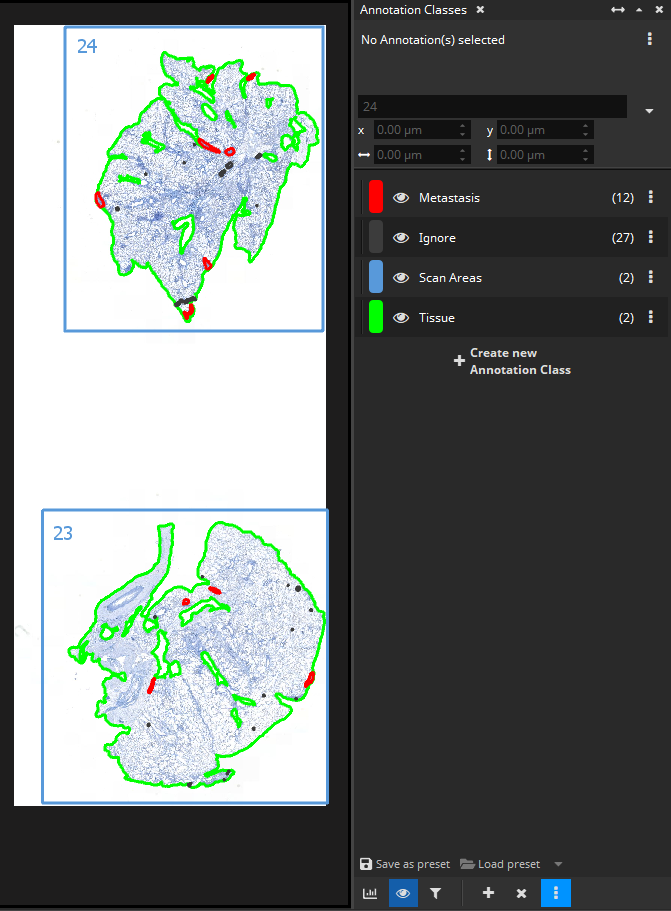
Special Classes: “Ignore”, “Tissue”, “Scan Areas”
3 classes have a special meaning:
- Tissue class: This class outlines all tissue, i.e., the foreground, in a scan. The “Tissue” class is generated by the Tissue Detection App (which is one of the free image analysis app that is also included in MIKAIA® lite), but can also be created manually. If no tissue has been detected yet, many other apps will also run the Tissue Detection App implicitly as a pre-processing step in order to prevent wasting time on analyzing background. If a Tissue class already exists, it will generally be re-used instead of re-computing it. This allows also to create manual corrections to the “Tissue” class before running the “real” more time-consuming analysis.
- Ignore class: This class is a means of preventing false positive detections. It is currently honored by the IHC Cell Detection App, HE Cell Detection App, Mask-by-Color App and FL Colocalization App. When these apps detect a new cell, they will check if it is contained in an “Ignore” annotation and if that is the case, treat it as a false positive, i.e., delete it and not add it to the scene. The area of “Ignore” annotations is not subtracted from the foreground area, which makes a difference when computing the cell density, stated in cells/mm².
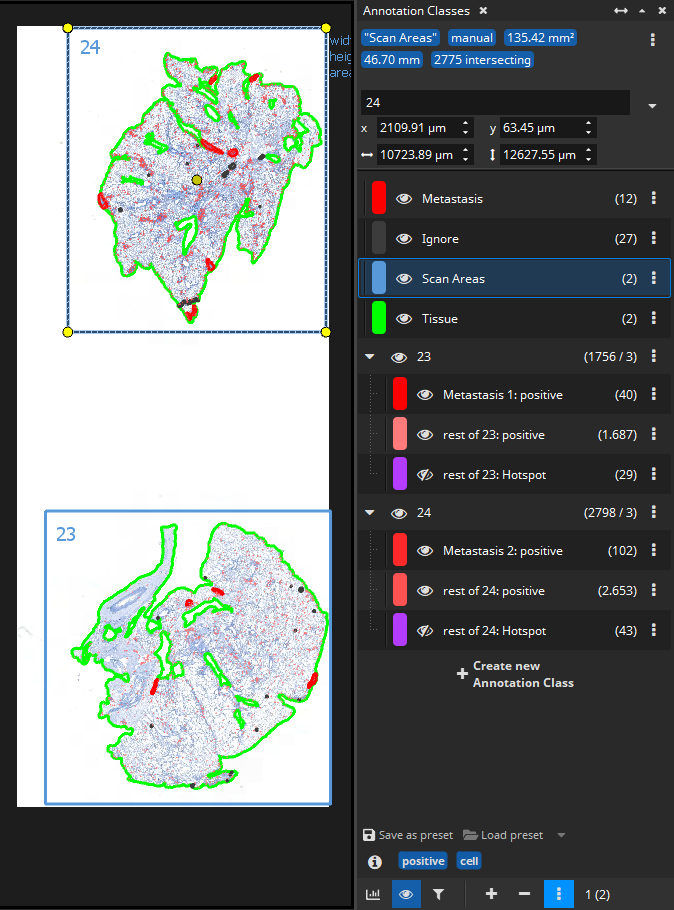
If an area shall be ignored and it also shall not be counted as foreground, then instead a hole can be added to the Tissue class using the Eraser or Magic Eraser Tools. - Scan Areas class: Sometimes glass slides contain more than one specimen, e.g., to save scanning time or when working with tissue micro arrays (TMA). When glass slides contain multiple specimens, it is important to calculate statistics such as tissue area (in mm²), DAB+ cell density (in cells/mm²), # hotspots, # cell clusters and histogram over cluster sizes separately for each specimen. To this end, a scan can be subdivided into Scan Areas. The user creates the special class and draws rectangles. Each rectangle will be treated as a scan area. The rectangles’ annotation text will be treated as the scan area name and shows up in the CSV exported after an image analysis. When no texts are entered, scan areas will be denoted as “Scan Area 1”, “Scan Area 2” and so forth. When working with Zeiss CZI, scan areas can even be automatically extracted from the metadata of the whole-slide-image file. For other scan formats this is currently (MIKAIA® v1.5) not yet possible.
Special classes can be created from the “Annotations” side panel’s drop-down menu:

Before analysis: Tissue detection, division into Scan Areas and ROIs
It is surely possible to batch-analyze a cohort of immuno-stained scan with the IHC Cell Detection App without doing any preparations. As the first step, when analyzing each slide, the app will automatically use the Tissue Detection App to distinguish foreground from background and then divide only the foreground into (overlapping) tiles and analyze them one by one.
But in some cases, it is necessary or advantageous to prepare each slide beforehand, for instance when slides need to be divided into scan areas or when additional ROIs such as Metastases need to be drawn in order to be able to distinguish between DAB+ cells inside a metastasis vs. outside a metastasis (vs. near to the metastasis when marking the tumor micro environment with zones/margins).
The hierarchy of a scan with two specimens (e.g., in a preclinical study: sections from two mice) where annotations outline metastases (either drawn manually or with the Mask By Color App or with the AI Author App) looks like this:
- whole-slide-image
- “Scan Area Specimen 1”
- Tissue (Foreground)
- “Metastasis”
meaning: inside any of the annotations in this class - “Rest of tissue”
meaning: not inside any annotation of the “Metastasis” class, but inside a “Tissue” annotation and inside the “Scan Area Specimen 1” rectangle.
- “Metastasis”
- Tissue (Foreground)
- “Scan Area Specimen 2”
- Tissue
- Metastasis
- Rest of tissue
- Tissue
- “Scan Area Specimen 1”
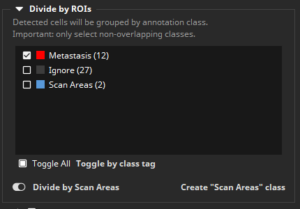
In the configuration panel, the IHC Cell Detection App then needs to be told that the class “Metastasis” shall be regarded as a ROI by selecting it in the class list in the section “Divide by ROIs”. Additionally, the “Divide by Scan Areas” switch needs to be toggled on, which is the case by default.
Tissue Microarrays (TMAs)
When working with TMAs, the Tissue Detection App can be configured to automatically create a Scan Area per TMA Core (see figure below). This way, downstream analysis apps such as the IHC Cell Detection App, the FL Cell Analysis App or the Annotation Metrics App will automatically compute statististics individually per TMA core.
Cores are automatically named: rows A, B, C,… columns 1,2,3, … ,e.g., the top left core is “A1”.

How to select Annotations
Multiple ways are possible to (multi-) select annotations
- Hand Tool: Annotations can be selected by clicking on them with the Hand Tool enabled. When the CTRL button is pressed simultaneously, the clicked annotation is added to the already selected annotations (multi-selection).
- Selection Tool: Alternatively, the Selection Tool can be used to draw a rectangle, which will select all completely contained annotations.
- Select all intersecting annotations: When one or multiple annotations are selected, the action to “select all intersecting annotations” becomes available. It will select all annotations from all classes whose shape intersects with any of the currently selected annotations.
- Select intersecting subset: When one or multiple annotations are selected, the action to select an intersecting subset becomes available. A dialog will show up, where the user can choose to select annotations from certain classes and/or with certain shapes.


Add comment