

You want to develop your own digital pathology AI? The following MIKAIA University application note explains how to create an AI training dataset using the MIKAIA Tile Export App.

The first step is to create a dataset of annotated tiles (also known as patches). This comprises two steps:
- Annotating slides
- Exporting labeled image tiles
Both steps are easily possible with MIKAIA lite. Annotate your slides (see separate App Note) or import existing annotations (e.g., from QuPath, 3DHistech Case Viewer or Aperio). Then use the Tile Export App to export tiles to the hard drive. You can extract tiles at the slide’s native resolution or any other desired custom resolution (µm/px). Tiles can even be overlapped. Each tile is saved as a PNG (other formats available) at the resolution that you need for your AI model. If you want to train a segmentation AI instead of a classification AI, the app can additionally export masks alongside the tile images where each pixel position encodes which annotation class is located at that position. If you want to train an object detection AI, use the Annotation Image Export App, which iterates over all annotations and positions a tile grid relative to each annotation.
App Description Table
| Input | |
| Staining | any |
| Microscopy mode | Brightfield, Fluorescence (current visualization settings will be applied) |
| Magnification | any |
| Supported Analysis Modes | ROI, FoV, Slide, Batch |
| Outputs | |
| Graphical Outputs | Optionally, rectangular annotations will be generated, visualizing the position of each exported tile. |
| Slide-level output metrics | Number of exported tiles and their total file size |
| Description | |
| Includes Tissue Detection | Yes, when enabled, only tiles that intersect the detected tissue will be exported. Background tiles are discarded. |
| Post-processing / additional options | none |
| Technology / Algorithm | This app does not carry out any image analysis (except tissue detection), but merely creates a virtual grid of tiles and export each tile as an image. Optionally, an additional greylevel image mask is generated for each tile, where each pixel value stands for a particular annotation class. The mapping of mask values to annotation classes is indicated in a separate text file that is generated into the export folder. |
| Speed | Seconds per field-of view. Typically < 5 minutes per whole-slide. Throughput is dominated by write speed, i.e., exporting to a fast local SSD is faster than to a remote network share. |
| Use cases | Create training, validation and test dataset for AI training (done outside of MIKAIA). |
Overview
This app is used to export tiles (= patches) from a whole-slide image. The workflow starts by creating a customized number of classes based on manually or auto-generated annotations. Then open the Tile Export App and set up a desired tile size (e.g., 256 x 256 pixels), degree of overlap, resolution (µm/px), and naming scheme. You can configure a file naming scheme in order to code information such as the origin, patch ID slide name or annotation class into the file name. The Tile Export App will optionally run the Tissue Detection App first in order to export only tiles that intersect with the tissue (and discard background tiles). Select multiple slides from the “Slides” pane in order to batch-extract tiles from all selected slides.
In addition, the app can generate a mask for each exported patch (grey-level segmentation mask) that serves as a map as to which pixel in the patch belongs to which annotation class. The pairs of image patch and pixel-accurate segmentation mask can then be used to train pixel-wise segmentation AIs such as U-Net.
Video
Step by Step Usage
In this application note, we demonstrate how the Tile Export App can be employed in a common use case.
Configuration
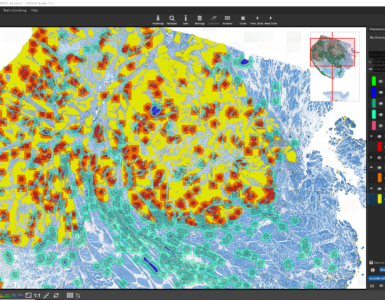
First, use the Tissue Detection App to outline the tissue and separate foreground from background.

Then, define a number of tissue classes according to your needs, e.g. three different classes that distinguish class A (blue), class B (orange), which is within class A, and class C (green), respectively.
Tile Export
Select the Tile Export App in the App center and configure the patches’ size as well as their overlap in pixels. Make sure that the z-order of the classes is correct, i.e., class B (orange) stays in top of class A (blue).

Afterwards define the resolution the exported tiles should have. The app allows exports at the native resolution or at a user-defined resolution. Finally, attributes such as the slide name can be coded into the file name.


Grey-level segmentation mask
Optionally, the app can generate a grey-level segmentation mask for each exported tile that serves as a map in which the intensity value of each pixel indicates the annotation class it belongs to. The pairs of image patch and pixel-accurate segmentation mask can then be used to train pixel-wise segmentation AIs such as U-Net.


Add comment