
Welcome back to the Deep Encode series!
In the previous post, we introduced the entire FAMIUM Deep Encode project and touched upon different aspects and components of the architecture, including a sneak peek into per-scene encoding. In this post, we will dive deep into the ‘complexity analysis’ portion of the project, in which we will introduce the workers and API’S that have been developed to support the video analysis.
A large part of this complexity analysis development involved heavy research into the field of computer vision. While there are several metadata attributes that influence the overall video encoding quality (such as bitrates, resolution size, etc.), we wanted to take a few steps further and look into actual video feature algorithms that can enhance the machine learning models. As stated in the previous post, values resulting from the complexity analysis are sent to a machine learning model in order to predict an optimal encoding ladder.
So, what’s been happening?
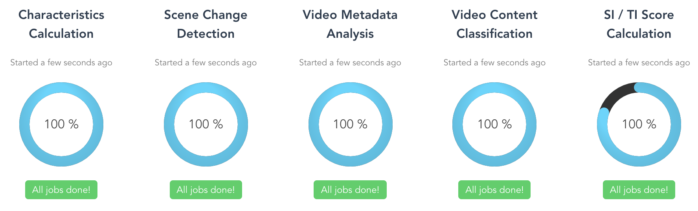
The complexity analysis is made up of several components:
General metadata extraction:
This worker extracts overall source video data, such as resolution size, bitrate, codec ID, Group of Pictures (GoP) size, etc.
Characteristics:
This worker extracts frames from the source video and produces histogram representatives of the frames, calculating its pixel intensity, image entropy and energy.
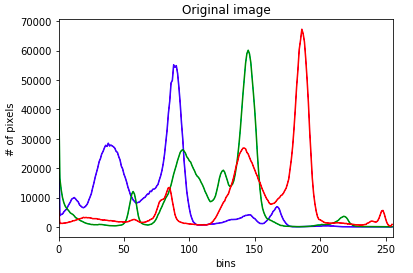
For this worker, frames are extracted from the source video, and histograms are constructed, separating each of the color channels (red, green, blue). Additionally, the histograms are calculated for its level of ‘darkness’ and resulting standard deviation values.
Spatial and temporal algorithms:
Like the Characteristics worker, the Spatial/Temporal information worker also extracts frames from the source video. Once frames are extracted, they are analyzed by spatial and temporal algorithms. Spatial information describes the relative position of an object in a video. The higher the spatial value, the more bitrate is needed. Temporal information, on the other hand, describes the motion difference between pixel values. A higher temporal value means that there is more motion in the adjacent frames.
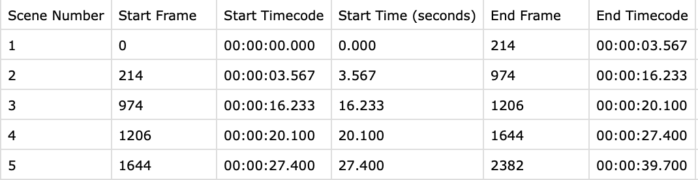
Scene detection:
Thus far, we’ve been working with 2 scene detection tools: FFMPEG and PySceneDetect, both of which have several advantages and disadvantages when it comes to detecting and extracting scenes. FFMPEG is an open source tool for all things media encoding-related (recording, converting, streaming, etc.) This tool detects scene changes based on a predetermined threshold between [0, 1]. PySceneDetect is a Python library that uses FFMPEG/FFPROBE as a basis for scene detection, and detects scene changes based on a predetermined threshold between [0, 100]. As a note, for the per-title encoding workflow, the scene detection worker is used as part of the complexity analysis, whereas it is removed for the per-scene encoding workflow.
Classification:
This worker uses MobileNet, a classification model that uses the convolutional neural network architecture (yes, we have models on top of models). It assigns 1 or more categorical labels to the source video. For example, if Big Buck Bunny was being categorized, it would most likely be labeled with ‘animation’, ‘bunny’, etc.
A majority of the components were initially developed as Python API’s and then integrated as web workers – these workers are then ‘triggered’ by an incoming source video.
What happens with these workers? These workers produce ‘virtual encodes’ – our substitution for the actual test encodes that are produced with the conventional per-title encoding method. The virtual encodes consist of values derived from the complexity analysis, which are then sent to a selected machine learning model:
{
   "clip":{
"s_video_id":"/home/fame/pte/storage/content/upload/1m_big_buck_bunny.mp4",
      "s_width":640,
      "s_height":360,
      "s_storage_size":5510872,
      "s_duration":60,
      "s_scan_type":"progressive",
      "c_content_category":"coral reef",
      "c_si":63.149,
      "c_ti":6.916,
      "c_scene_change_ffmpeg_ratio30":6,
      "c_scene_change_ffmpeg_ratio60":3,
      "c_scene_change_ffmpeg_ratio90":1,
...
   "encodes":[
   {
      "e_aspect_ratio":"2:1",
      "e_pixel_aspect_ratio":"1:1",
      "e_codec":"h264",
      "e_codec_profile":"main",
      "e_codec_level":31,
      "e_framerate":"25",
      "e_ref_frame_count":1,
      "e_scan_type":"progressive",
      "e_bit_depth":8,
      "e_pixel_fmt":"yuv420p",
      "e_b_frame_int":1,
      "e_gop_size":60,
      "width":3840,
      "height":2160,
      "e_width":3840,
      "e_height":2160,
      "e_average_bitrate":250
   }
...
]
}
Mind you, the effort behind this research and development did not happen overnight. We conducted extensive research and development into the field of Computer Vision – looking into different video feature detection algorithm and determining how closely correlated a certain algorithm can impact video quality.
Pitfalls:
The JSON code snippet above shows only a portion of the data that is sent to the selected machine learning model. As you can see, it is A LOT. A large part of the workflow (in terms of timing) consists of the complexity analysis component – depending on the video file size, the workers can/may take a longer time in computing the complexity. Several adjustments were made to the workers in order to speed up the entire workflow (from source video input, to downloading production encodes).
The Characteristics worker, as mentioned, extracts frames from a video, then performs its relevant calculations. However, at 1fps, for a video that lasts over 10 minutes, this practice is not efficient. Therefore, this configuration was adjusted to extract frames at 1 frame per 60 seconds, which allowed the worker to compute video characteristics at a faster rate.
The Scene Detection worker (PySceneDetect) also tends to perform slower (in terms of the overall complexity analysis timing) with larger video files and threshold values that detects more scenes. To overcome the latter, we’ve set a ‘default threshold’ for this worker, so fewer, but significant scenes are detected.
Wait, there’s more…
In addition to the complexity analysis, we’ve developed additional API’s and workers in order to enhance/automate the existing architecture. Here are a few highlights:
Encoding ladder:
In order to determine the optimal encoding ladder out of 30+ bitrate/VMAF predictions, we’ve developed an API that interpolates through the results and produces ideal bitrate/VMAF pairs per resolution.
Live streaming:
To support live streaming input, separate components were developed so that fixed-length scenes are extracted from the streaming URL prior to the complexity analysis.
Data Export:
This functionality utilizes all videos in our repository to develop data from the virtual encodes. A CSV is produced as a result, and used as training data for the machine learning models.
Production Encoding:
This feature enables and produces the actual encodes that result from the encoding ladder.
What’s next?
As mentioned in the first article, we are currently looking into per-scene encoding. Currently in development, is an additional worker that detects and records scene timestamps in the database, as well as extract scenes to be sent to the complexity analysis components.
Also in development are two workers for the complexity analysis: color quantization and principal component analysis. These algorithms have been tweaked to support and calculate significant values that correlate with video complexity and quality.
Conclusion
In this blog post, we dove deep into the workers and video complexity analysis of FAMIUM Deep Encode, as well as additional API’s that enhance our overall architecture. Stay tuned for Deep Encode, Part III!
If you have any questions in regards to our Deep Encode activities, please check out our website.