
In 2016, Netflix introduced the concept of per-title-encoding. In a very interesting blog post and a detailed paper, Netflix described their findings and how the results can be interpreted. In this blog post, I would like to describe my understanding of per-title encoding and how to reproduce the results of Netflix using ffmpeg.
What is per-title encoding?
Per-title encoding is based on the fact that different types of video content require different bitrates and encoding settings to achieve a certain quality. Compared to classic approaches, in which the same, predefined encoding ladder is applied for all types of content, per-title encoding has the potential to significantly decrease the storage and delivery costs of video streams. Easy-to-encode videos can be delivered with much lower bitrates while improving the perceptual quality. In addition, movies or sport streams, which contain a lot of movement, are streamed with lower resolutions to avoid a bad quality of experience for the viewer.
To illustrate these findings, consider the figure below:
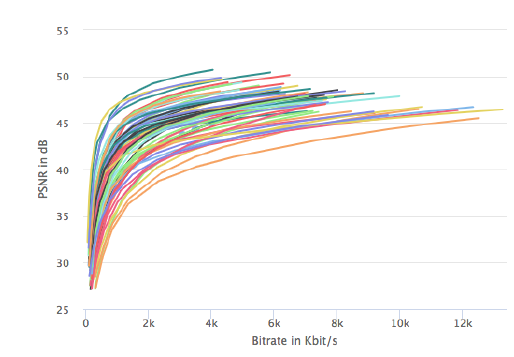
In this case, different movie trailers have been encoded with the same Constant Rate Factor (CRF) values. The chart shows the resulting PSNR and bitrate values at a resolution of 1080p. While some of the assets achieve a “good” PSNR value of 40-45 at bitrates of 1Mbit – 2Mbit, other input files require around 3Mbit – 6Mbit. Consequently, some of the movie trailers are easier to encode and less complex than others.
How to implement per-title encoding
So how can we actually determine the complexity of an asset and come up with individual encoding settings? For that purpose, Netflix more or less uses a brute force approach. Lets go through that step by step:
1. Perform multiple test encodes
To start off, we need to perform multiple test encodes. These test encodes will help us in determining the optimal bitrate/resolution pairs later. In my tests, I used 1080p videos as an input. Seven target resolutions with 12 different CRF values lead to a total of 84 test encodes.
| Codec | Resolutions | CRF Values |
| H.264 | 1920×1080, 1280×720, 720×480,640×480, 512×384, 384×288,320×240 | 18, 19, 20, 22, 25, 27, 30, 35, 40, 45, 50, 55 |
The ffmpeg command for these types of encodes is pretty straight forward:
ffmpeg -i input.mp4 -y -vcodec libx264 -filter:v scale=w=1280:h=720 -crf 30 output.mp4For each of the 84 different settings, we tell ffmpeg to encode in H.264 at our target CRF value and scale the output to our target resolution.
2. Determine the quality
Now that we have finished our 84 test encodes, we want analyze the output and determine its quality compared to our input video. For that purpose, we will use the peak-signal-to-noise-ratio (PSNR). At this point, some might argue that PSNR is not a good indicator for the perceived quality of a video. I agree on that, nevertheless, the following principles also apply for other metrics like SSIM or VMAF. The main benefit of PSNR is that the calculation is comparatively easy and does not take much time.
2.1 Upscaling to the source resolution
By definition, PSNR and other quality metrics only work on videos having the same resolution. Since most of our output videos have a smaller resolution than our input, we have two options: either downscale our 1080p input video to the respective output resolutions, or upscale our outputs to 1080p.
Because almost all TV sets support resolutions of at least 1080p and Netflix is mainly consumed on such devices, upscaling our outputs is the way to go. Still, how can we upscale our videos without re-encoding them? The trick is to output raw files. That way, the content is not re-encoded but still upscaled. This leaves us with the following ffmpeg command:
ffmpeg -i output.mp4 -y -pix_fmt yuv420p -vsync 0 -s 1920x1080 -sws_flags lanczos output.y4mIn one of their latest blog posts, Netflix recommends using bicubic upsampling, which is also the ffmpeg default. If you want to do it that way, you would replace “lanczos” with “bicubic”.
2.2 PSNR calculation
Now that our input and output assets have the same resolution we can do the actual PSNR calculation:
ffmpeg -i output.y4m -i input.mp4 -y -filter_complex psnr -f null -I would recommend to do step 2.1 and 2.2 sequentially for each of the outputs. As the name indicates, the raw files tend to become very large. Unless you have terabytes of space on your hard disk, you might end up in situations where you only have a few kilobytes left (trust me, I’ve been there).
3. Analyzing the results
At this point, we have the resulting PSNR and bitrate values for each of our 84 test encodes. So what do we do with that? A good idea is to continuously plot the values and see what happens:
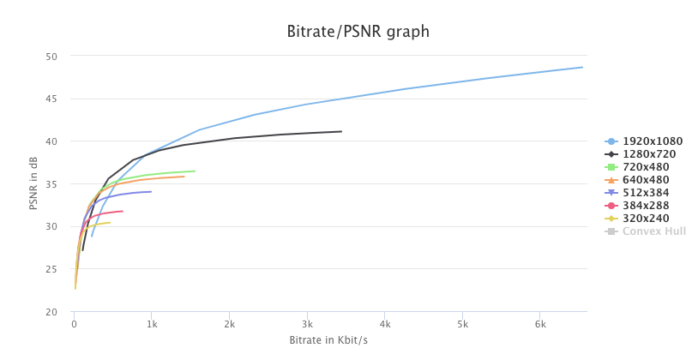
This looks very promising and similar to the graphs we can see in the Netflix blog posts and paper. For now, ignore the convex hull description on the right. What we can observe is that lower resolutions outperform higher resolutions at low bitrates. For instance, at around 500Kbit/s the 480p and the 720p resolutions deliver better PSNR values than the 1080p resolution. Even though the content is upscaled on the playback device, the quality is still better.
Moreover, just like in the Netflix examples, the bitrate/PSNR curves start flattening out at some point. Hence, increasing the bitrate will not result in better quality.
4. Convex hull calculation
Netflix states that the optimal bitrate/resolution pairs are located at points closest to the convex hull. So let’s take a look how our chart looks when we calculate the convex hull:
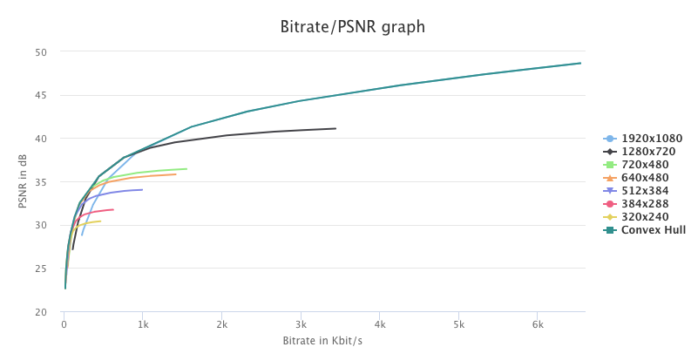
Pretty much what we expected: the convex hull curve covers the best bitrate/PSNR pairs of the seven resolutions. Depending on our needs as a streaming provider, we can derive the target encoding ladder from the test encodes, the resulting PSNR and convex hull values.
5. Determine the encoding ladder
Streaming providers are aware of the bandwidth available on the client side. They might have certain fixed bitrates which they want to provide, because a lot of their viewers’ internet connections are limited within this bitrate. Therefore, the most straight forward approach to use our data is identifying the optimal resolution for a certain bitrate. Compared to classic one-size-fits-all encoding ladders, this offers the following advantages:
- For easy to encode content: a better resolution and a better quality at the same bitrates
- For hard to encode content: the potential to stay below 1080p and avoid artifacts and blurriness in the video.
Conclusion
This concludes our small dive into the field of per-title encoding. We did not touch topics like scene-based encoding and optimizing for high-complexity parts of the source video. In addition, machine learning techniques such as Random Forest Regressor can be helpful to avoid the large amount of test encodes. Further information on all that can be found here.
Peter says:
I have a problem when I use the next command:
“ffmpeg -i output.y4m -i input.mp4 -y -filter_complex psnr -f null-”
The warning is the following one : Filter psnr has an unconnected output
How can I solve this problem?
Daniel Silhavy says:
Hi, there was a small mistake in the command. The “-” in the end needs to have a whitespace after null:
ffmpeg -i output.y4m -i input.mp4 -y -filter_complex “psnr” -f null –
Peter says:
Thanks Daniel!
I have another doubt. How do you obtain the bit-rate values for each test encodes, later to plot them?
I get the PSNR values for each combination of CRF and resolution options (in the way that you show us in this article), but taking into account that the rate control mode CRF gives you a constant quality throughout your encoding process, I understand that different bit-rates are used during the process depending on the content complexity. How do you get the relation between the obtained PSNR values for each resolution and CRF options, with the bit-rates?
Daniel Silhavy says:
Hi,
we extract the average bitrate of the encodes. Note: Due to CRF encoding, bitrate will vary over time (also an argument for per-scene encoding). You can extract the average bitrate using ffprobe. An example is available here: https://video.stackexchange.com/questions/16356/how-to-use-ffprobe-to-obtain-certain-information-about-mp4-h-264-files
Robert Grosso says:
Hello, Excellent work. I believe there is a typo in the descriptions of the resolutions, 382×288 is described but the graphs show 384×288. Thank you for providing this article.
Daniel Silhavy says:
Thank you for pointing that out, just fixed it.
Tanmaya P says:
Hi Daniel
I have a question. Generally while Encoding a video, we Encode a Video to different Resolutions. For example: We have a 1080p video, and we will Encode this 1080p video into lets say 3 formats (720p, 480p and 360p). So here we have different resolution videos. So how could we calculate PNSR in this case when we have different resolution Original file and different resolution Encoded files.??
As per PSNR the source and input video should be in same resolutions.
Thanks
Daniel Silhavy says:
Hi,
you will need to upscale your encoded videos to original resolution before calculation the PSNR or VMAF. This is what is described in Section 2.1 of this post.
Bartosz S says:
Hello,
I am pretty aware of what a convex hull is, but I have no idea how to represent it on a graph as a line. Could you explain how to transform such a convex hull into such representation?
Daniel Silhavy says:
We used a library for plotting the hull based on the data points: https://www.npmjs.com/package/hull.js